Select Page
Installing an Airhead composting toilet in our Airstream

Installing an Airhead composting toilet in our Airstream

Is a composting toilet really better for full time RV living?

The idea of not having a toilet magically sweep your poo poo and pee pee away into the mysterious void that is the public sewer system was a foreign concept to us for a long time. Years ago, we’d look at potential cabins to stay in on Airbnb. Look at those windows! It’s close to the bike trails! Oooh, look, a hot tub!! Wait, it’s got a COMPOSTING TOILET!!!??? Yuck! I don’t want to poop into a 5 gallon bucket and smell it all weekend. No thanks! Next listing!

When we started full-timing, we heard of people getting rid of their RV toilet in exchange for a composting toilet. What is wrong with these folks? How does letting your poop sit around in a bucket make RV life better? How do they live with all those odors wafting around their rig? These are the kind of questions we had. We didn’t dig too deep into them, because we were certain a composting toilet was NOT for us!

It wasn’t until we were on the road a while that we ran into a couple with a composting toilet. And they wouldn’t stop talking about it! Like it was the best upgrade they made to their RV, something that had truly changed their lives. We were all for the conversation of course, we love bathroom humor.

We continued to meet other couples who absolutely loved their composting toilets, as we made friends on the road. There had to be something more to this. We were truly intriged. We would pepper them with questions on how these things worked and listen intently to their answers. We would go into their bathrooms at stare at the odd shaped plastic commodes…at a distance of course. We would wonder what it would be like to not have a smell in our bathroom, or not have to dump that blackwater every week or so.

Fast forward a few months, our traditional RV toilet needed a new seal, we were looking at ways to boondock longer, and we would have access to some more tools since we’d be moochdocking at our friends’ house in Victor, Idaho. This would be the perfect time to swap out our toilet!

How these composting toilets work:
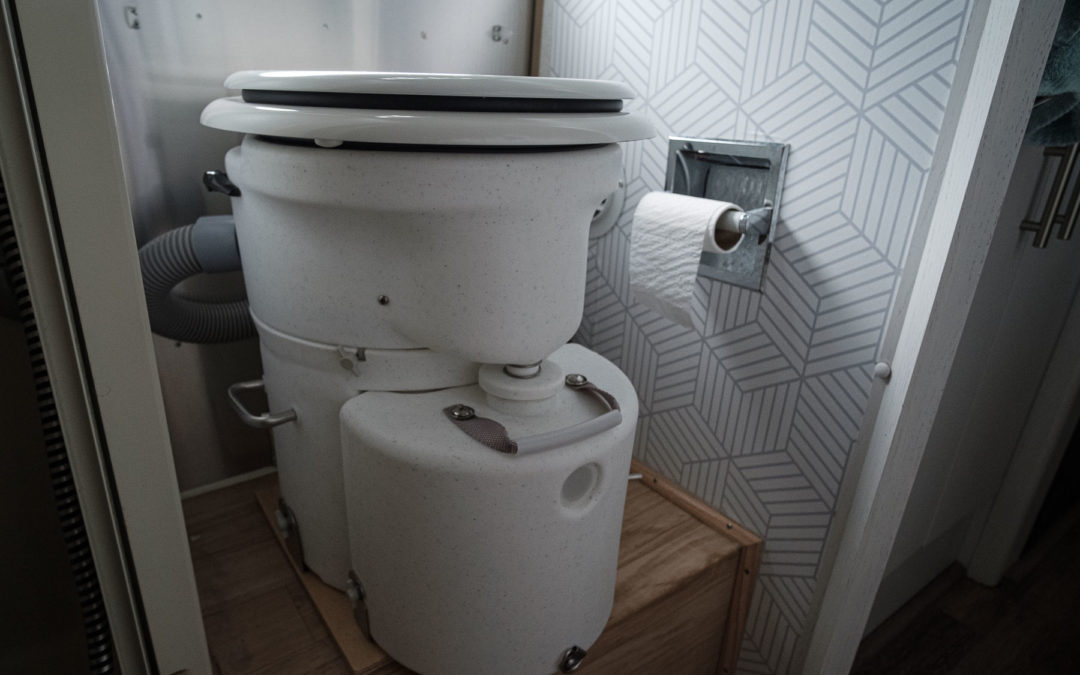
Modern composting toilets are not just a bucket you defecate into and sprinkle sawdust to cover it. They have been designed to separate the liquids and the solids. It’s not until #1 and #2 gets combined that things get really nasty. Urine is directed to the front of the unit and is collected in a detachable bottle that gets emptied every few days. The brown stuff gets deposited through a trap door in the bowl into a chamber filled with coco coir. You rotate a handle on the side of the unit and chops the logs and mixes them with the coco coir. There is a fan that draws air from the solids to help dry out and break down the mixture. The solids tank is supposed to last for a month with 2 people using it full time. You can read more about it here on Airhead’s site.

What we hope to gain:
It would be nice to save on some water when boondocking. Our toilet was supposed to use a pint of water when flushing, but that is an ideal scenario “quick flush”. We all know it literally “doesn’t go down like this”.

No black tank smell. Even though we use Bio Paks, we can still develop a wretched stank in our bathroom, especially in hot weather. We’ve been told the smell isn’t bad with a composting toilet, nothing more that a hint of “rich fertile soil”…time will tell.

We only need to deal with the grey water when we head to the dump station, no need to blast out poop residue on our hose after dumping.

Stay in one spot for a longer time. Maybe even indefinitely if we purchase some land in the future. Dealing with the disposal of greywater far from a dump station is way easier than getting rid of black water. You don’t have to run things through a mastication pump in order to chew up the nastiness. Our Airstream was parked in our driveway for 3 years before we hit the road. We would sleep in it when we’d Airbnb our house, or have friends stay in it, BUT we wouldn’t dare use the toilet! If we had a composting toilet installed at this point, we could have been utilizing the trailer even more.

Why Airhead?
There are a number of popular composting toilet makers out there. We considered Nature’s Head and C-head before we settled on Airhead. All of these manufacturers seem to get great reviews, have good customer support, and use “head” in their product name. They all have similar features, but a few things stood out for us with Airhead.

First off, the Airhead uses a regular shaped toilet seat. Our rumps are familiar with the curve of such a seat, and prefer it when we make our “deposits”. This seat also has rubber gaskets to keep any odors that might creep up down below.

You can empty the liquids jugs without opening the solids container. This is something that needs to happen every few days, so not having to stare into the brown depths each time is a welcome relief.

The fit and finish of Airhead is great. The plastic is nicely molded and the hardware is top notch. The build quality should hold up to years of abuse on the road. It even looks a lot like a regular toilet, if that counts for anything.

Installing the composting toilet in an Airstream:
Installing one of these is pretty simple on the surface. You take out the old toilet. Plug the hole. Add some new brackets to hold it down. Run wire for a fan. Vent that fan. Nice and simple.

This becomes much more difficult when you try to install a composting toilet in an Airstream you’re currently living in. There were no easily accessible wires to tap into, so we had to fish some wires in from another location.

It was not possible to run a vent downward due to the black tank, and we’d have to remove some walls in order to run the fan vent to the roof (unless we just wanted a hose dangling from the ceiling in the bathroom). We ended up running the fan into the black tank vent, which was really close by. This required building a custom fan housing, since the one included was bulky and would have to be reduced to 1.5″ in a very short distance.

The last bit of fabrication involved building a little platform so the composting toilet could sit flush above the black tank toilet mount. Check out our video to see some more details on the installation.

While we had the toilet out and bathroom apart, Jess updated the wallpaper to something more modern. This really made the tiny space feel like it fit in with the rest of our Airstream.

Once the composting toilet was installed and the fan was running, we soaked the coco coir in water for a few hours. The coco brick swelled up after absorbing it and then we broke it up and added it to the solids tank. This gave us some exciting stuff to churn around.

See the pics below for install shots:

Why not remove the black tank completely?? Not having one could save some weight, or make room for another fresh or grey tank, we could eliminate the toilet pedestal to make the bathroom feel roomier, and not having the black tank sewer lines would give us a bunch more ground clearance. All great things! So we definitely considered this, and still might do it in the future.

We were a little concerned that we might not like the composting toilet, so having the black tank in place would let us retreat to a normal RV toilet. Also, not having a black tank might hurt resale if we ever decide to sell the Airstream in the future. And removing it would require us to rebuild the floor in the bathroom, not an easy task considering we don’t have many power tools on the road.

We traded our old toilet to someone on Facebook Marketplace for some IPAs, so we’re committed to using the Airhead toilet from here on out. We’re excited to see if it improves our lives in the way it did to our boondocking friends. Stay tuned for an update on this thing in the next month or two!

What kind of questions do you have regarding our decision to go with a composting toilet?

Here are some of the things we used for our install!

This is to plug up the black tank – https://amzn.to/2YlTfiZ

rubber reducer – https://amzn.to/31lclTm

PVC fitting to join to existing vent – https://amzn.to/2YBkP77

PVC to adapt hose to reducer – https://amzn.to/2YmQHBr

PVC cement and primer – https://amzn.to/2YElQv6

Wallpaper – https://amzn.to/2Kyjqt5

Ryobi Impact Driver and Drill – https://amzn.to/2LX6akR

Ryobi Jigsaw – https://amzn.to/2YiLsCJ

These links are affiliate links, following one and purchasing an item helps support us and does not affect the cost of the item. Thank you for making a purchase via these links if you do.

Downsizing: An Interview with Aimee Olsen of Life Done Simply

Downsizing: An Interview with Aimee Olsen of Life Done Simply

Downsizing: An interview with Aimee Olsen

One of the biggest challenges we faced before hitting the road was downsizing our lives and possessions to fit into a 180 square foot Airstream. We read stuff from Marie Kondo, The Minimalists, and many others to help us in our purge. Even with all this advice, we still found the task to be very daunting. That’s why we’re putting together a downsizing series of videos.

For the first video in our downsizing series, we interview Aimee Olsen. Aimee is an organization expert who also happens to live on the road full time with her partner, Ben, and golden retriever, Selby. She understands first hand what it’s like to whittle down her life to fit into an RV. Plus, she has helped many of her clients declutter their homes and work towards a more organized life.

We hope her wisdom helps you frame your own goal of decluttering and sets you on a path to success!!

Learn more about Aimee, or reach out to her:
Instagram – @lifedonesimply
Website – lifedonesimply.com
Email – aimee@lifedonesimply.com

Follow Aimee and Ben’s RV adventures here – @theroamsteaders

Learn about how we downsize and declutter on the road – http://tincancreative.co/how-we-downsize-and-declutter/

Do you have questions about downsizing? Let us know in the comments below!

Our first 6 months of life on the road

Our first 6 months of life on the road

Our first 6 months of life on the road

February 2019 marked 6 months! That’s just CRAZY. We have so much more to learn, but so far – we are loving life on the road.

We posted a question on Instagram, asking “What do you want to know about the first 6 months of life on the road? There were a ton of great questions like, “What is something you thought was going to be hard, but really wasn’t?” and “What’s the most surprising part about being on the road?”

After answering the questions we received on IG, we figured, why not make a video for YouTube to share this information. 🙂 Check it out below!

5 Practical household items for RV life and tiny living

5 Practical household items for RV life and tiny living

5 Practical Household Items for RV Life and Tiny Living

We have to be pretty selective nowadays when it comes to items we bring into our life… you know, because only have 200sq feet to work with! We decided to put together a short video highlighting 5 of our FAVORITE household items we use every single day! Things that make our life easier on the road and are also very practical to have. In fact, we owned a few of these items even before hitting the road! 

We provide links to the items we talk about below.

Please note that these are our Amazon Affiliate links. There is no additional cost, whatsoever, to you, but it does help us earn a tiny bit of revenue if you choose to purchase any of these items! So thank you!

1. Fozzils Snap Fold Dishrack: https://amzn.to/2KobdqY

2. Aeropress Coffee Maker (owned prior to life on the road): https://amzn.to/2TwsyCh

3. Black + Decker Handheld Vacuum (owned prior to life on the road): https://amzn.to/2PKEFgP

4. Simplehuman Trash Can: https://amzn.to/2TuatVo

5. Felt Storage Bins: https://amzn.to/2Kon8Fa 

What household items do you use on a daily basis that help make your life better?! Tell us in the comments below!

Airstream upgrades for full time living

Airstream upgrades for full time living

Airstream Upgrades for Full Time Living

A few years ago, we purchased Jowanda, our 2005 25ft Airstream from a guy who lived in Florida. He and his wife wanted to purchase a newer Airstream and so put this one up for sale on Airstream Classifieds. We’re happy to answer any questions when it comes to how to find a used Airstream!

Anyhoo- Jowanda was in GREAT shape. She was only 10 years old when we purchased her, and was very well taken care of. So why make upgrades?

We wanted to make upgrades to our Airstream for 3 reasons

1) To make it easier to boondock (boondocking just means that we’re camping off the grid without any hookups)
2) To make it more suitable for full-time living
3) To make it feel like home

Here’s our VERY FIRST YouTube video where we talk about the upgrades and include some pretty fun footage back from our reno.

List of upgrades we talk about in the video:

1. Solar power installed
2. Painted all cabinets/doors/walls white that were faux wood
3. Painted couch + dinette upholstery
4. Removed fabric and painted dinette frame
4. New floating floors throughout
5. New countertop, sink, faucet and magnetic knife holder (all from Ikea)
6. Removed Microwave for more storage

List of upgrades we totally forgot to talk about in the video:

1. Antenna
2. Inverter Installed
3. More USB plugs so we could charge more things while boondocking and not have to rely on our inverter so much
4. Removed the stock divider that separates the bedroom from the rest of the Airstream and added tension rod w/ curtain instead

List of upgrades we may do in the future:

1. Revamp the bathroom with some wallpaper so it doesn’t look so dingy
2. Lift Airstream for more off-road travel

Items discussed in our video

(Please note that some of the links below are affiliate links. This does not cost you anything at all, and we would make a tiny percentage if you were to purchase the item. Thanks!)

PAINT:

Couch Paint: Graphite by Annie Sloan

Dinette Paint: Provence by Annie Sloan

(Annie Sloan paints are only provided by select stockists – you can find your closest stockist by visiting: https://www.anniesloan.com/stockists)

Cabinet Primer: Extreme Bond Primer (Sherwin Williams)

Cabinet Paint: Emerald Urethane Trim Enamel in Origami White (Sherwin Williams)

Shelf Paint: Old Ochre by Annie Sloan (design on buckets done with white spray paint and Primer Red)

KITCHEN:

Countertop: Ikea Countertop

Kitchen Sink: Ikea Norrsjon Sink

Kitchen Faucet: Ikea Almaren Faucet

Knife block: Ikea Knife Block

TOOLS:

Sander: Bosch Random Orbit 5 inch Sander/Polisher

Sanding Pads: Sanding Pads

FLOORING: 

Vinyl Plank Flooring: Lifeproof Walton Oak (We needed about 6 cases)

SOLAR STUFF:

Victron SmartSolar MPPT 100/30 Charge Controller with Bluetooth

Victron BMV-712 Battery Monitor with Battery Temperature Sensor

1000W Inverter

Inverter fuse holder and 150A fuses

Our first month living on the road

Our first month living on the road

Our first month living on the road

Highlights, Stats and Lessons Learned!

This past month has flown by. Living on the road (so far) has been pretty fun and exciting. That’s not to say it hasn’t come with its challenges but for the most part, we’re starting to figure this whole lifestyle out as we go. We wanted to put together a few fun highlights, stats, and lessons learned from our first month on the road. So enjoy! We’d love to hear your feedback + comments!

HIGHLIGHTS | WEEK ONE

Westward ho!

Spent a few days in Springfield, IL to visit our dear friends and their newborn daughter, Eleanor.

Visited the Lincoln Presidential Museum and President Lincoln’s Springfield home

HIGHLIGHTS | WEEK TWO

Bikepacking + Boondocking

Jess + friends hit the Idaho Hot Springs Route on their bikes and ride 200+ miles from Boise to Stanley, Idaho

Jay + Cooper found a sweet boondocking spot up Trail Creek Road near Ketchum. Yay free camping

HIGHLIGHTS | WEEK THREE

Ketchum friend party

More friends from the Northeast come to visit us in Sun Valley

Ride awesome singletrack with friends and hit up Frenchman’s Bend Hot Spring

HIGHLIGHTS | WEEK FOUR

SURPRISE VISIT

Missing our friends who had just left to return east. Luckily, Jay’s cousin, Andy, drives from Oregon to visit us for a day!

Met some nice locals on a ride, one whose name is also Jay and is also a photographer

MONTH ONE | LESSONS LEARNED

Appreciate the time you have with family and friends.

Talk to locals.

Don’t put Nyquil in the upper medicine cabinet. It will fall over and leak all over everything.

Always turn the bathroom fan on before you start going #2 in the bathroom.

(Jess)

You really don’t need as much as you think you do.

When in doubt, bring your camera.

Dryer climates mean drink more water!

VHB tape and mineral spirits are amazing.

See a public restroom, use it.

Charge electronics during the day when we’re producing electricity via solar.

You can really do anything you put your mind to.

Don’t change your oil in the O’Reilly Auto Parts parking lot if you don’t have to.

(Jay)

5 people, is a lot of people to sleep in a 25ft Airstream.